Halloween Party

DIY Coffee Filter Garland ... Guest Post by Laura of Lovely Wren

 tháng 5 30, 2014     DIY, guest post, party ideas     No comments   

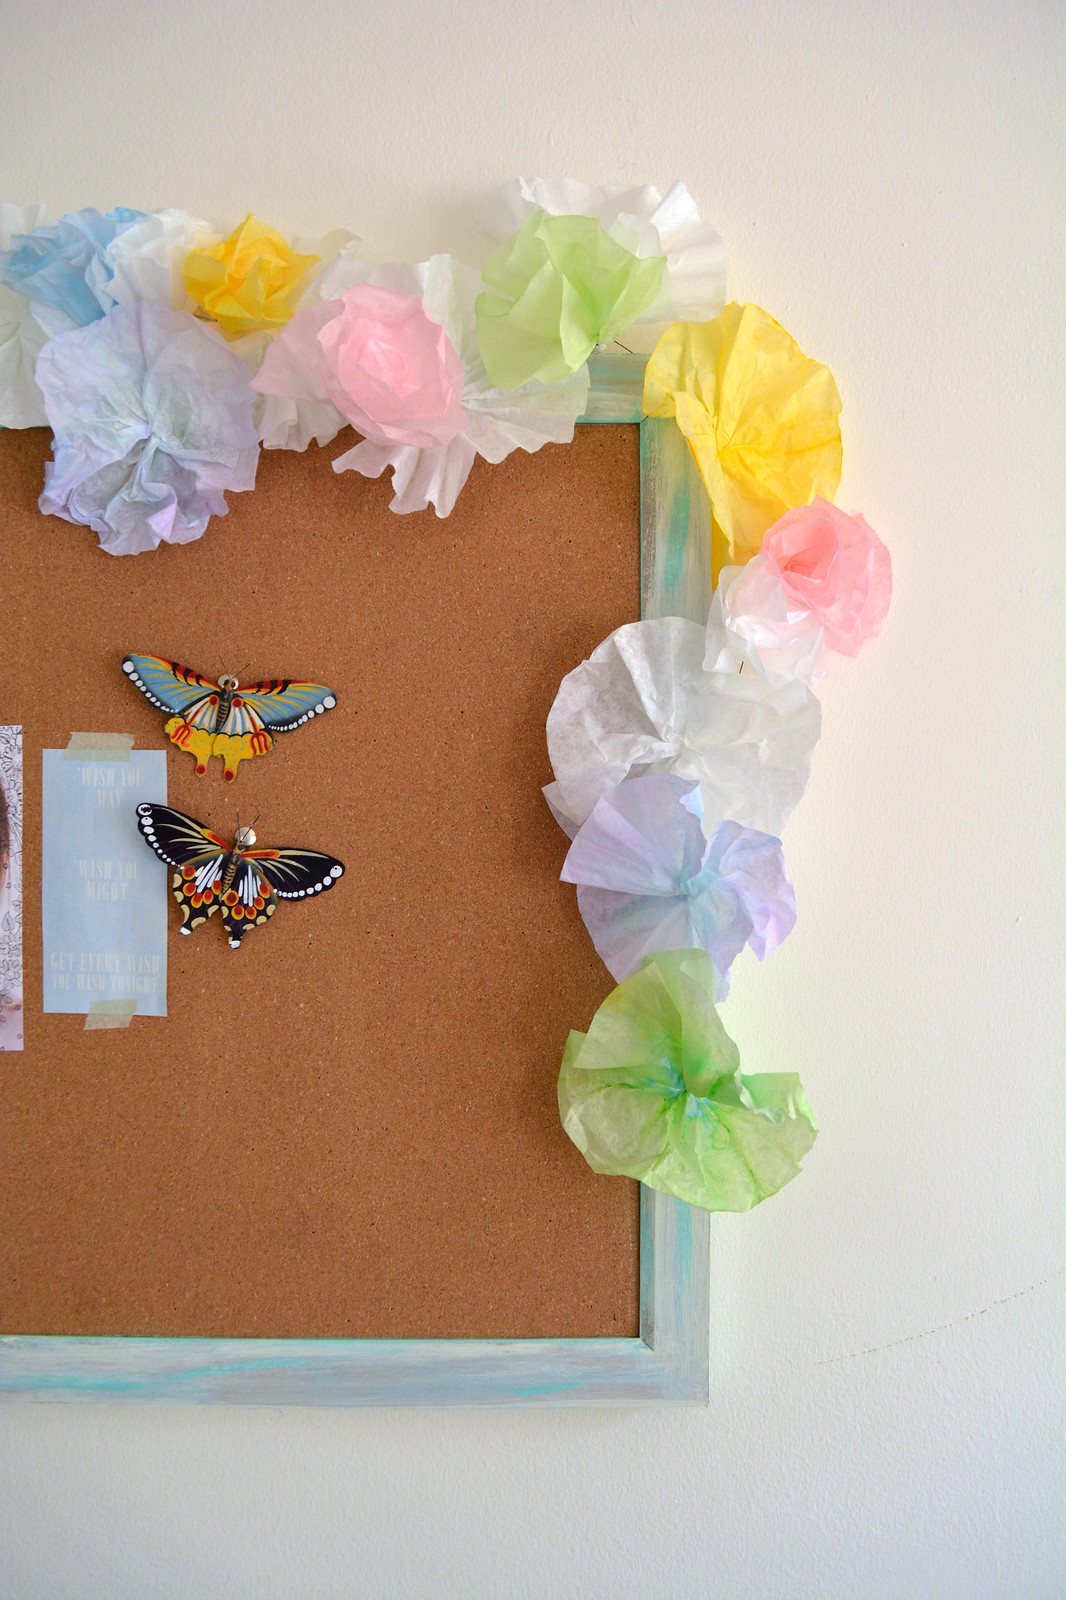
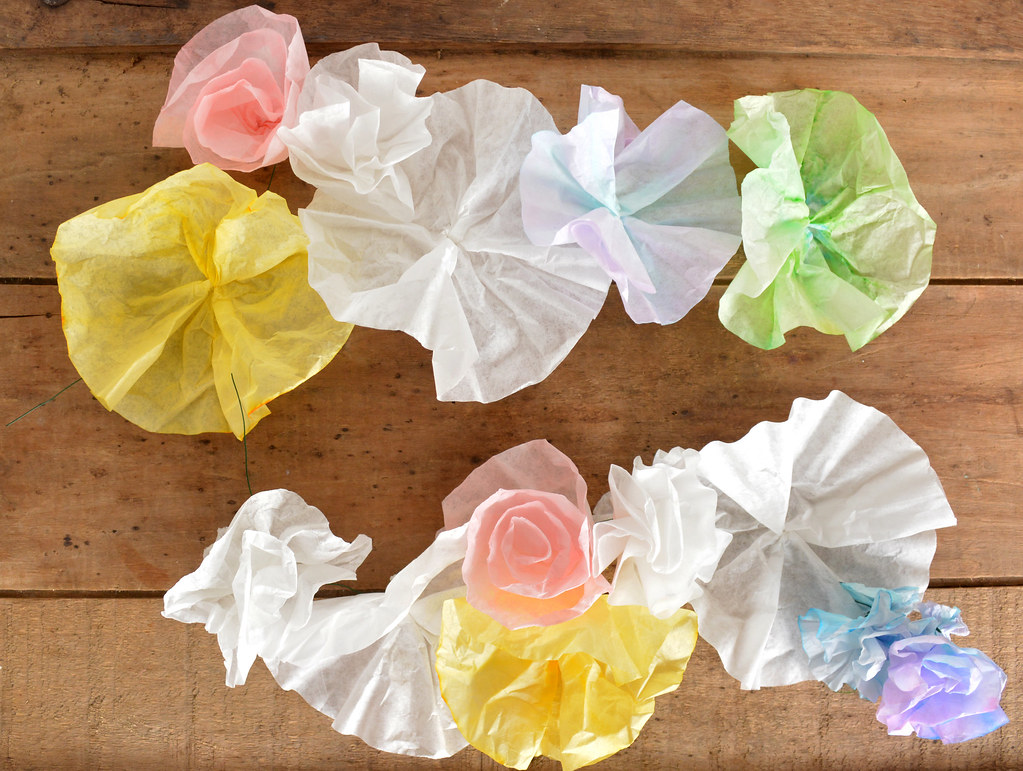
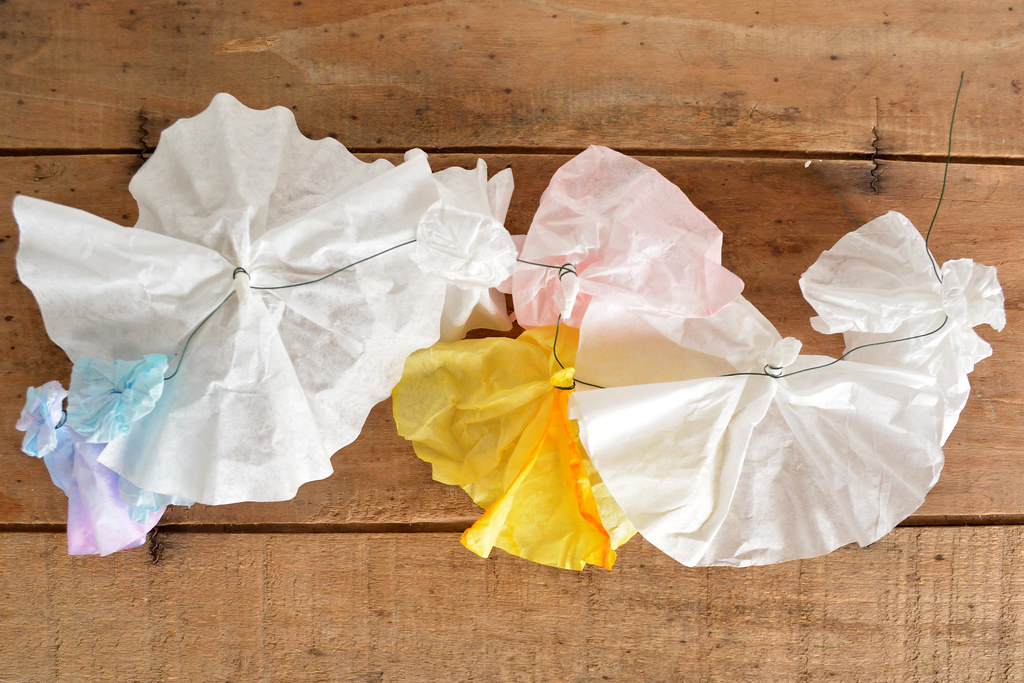
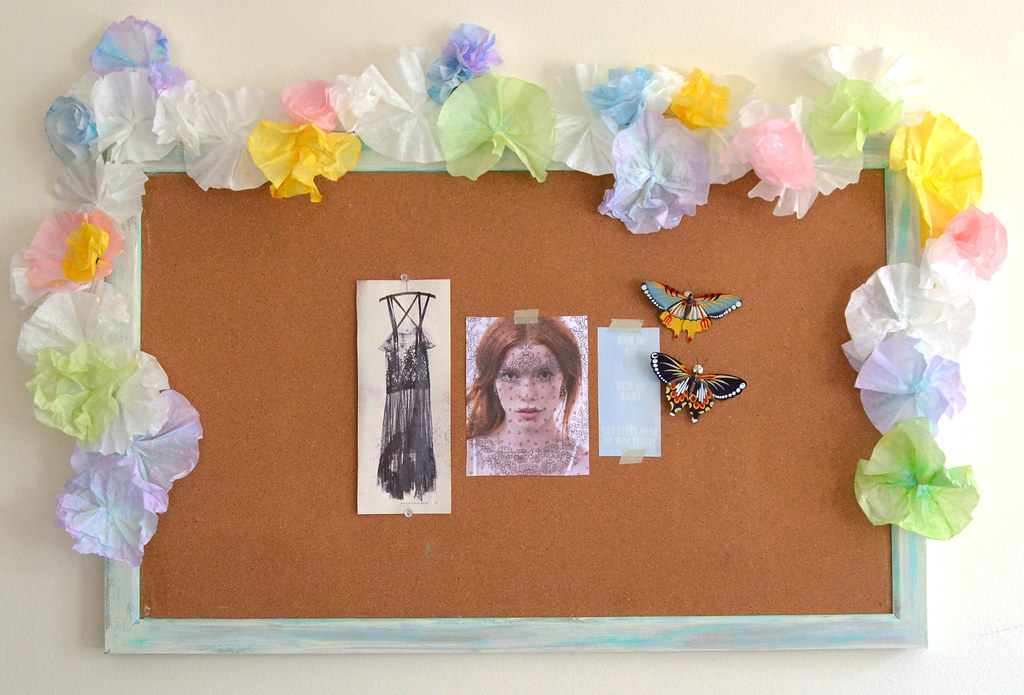
Hi Everyone! My name is Laura, and I blog about knitting, crafting and photography over at Lovely Wren. I've never done a blog swap before, so I'm thrilled to be trying it today for the first time. A big thanks to Daniela for having me :) I've come up with a sweet little DIY coffee filter flower garland to share with you today. It's somewhat time consuming, but easy to do, and gives you beautiful results! I made it to hang over my corkboard and brighten up my apartment, but it would also be great for birthday parties, baby showers, bridal showers, or just about any kind of party! 


Garland

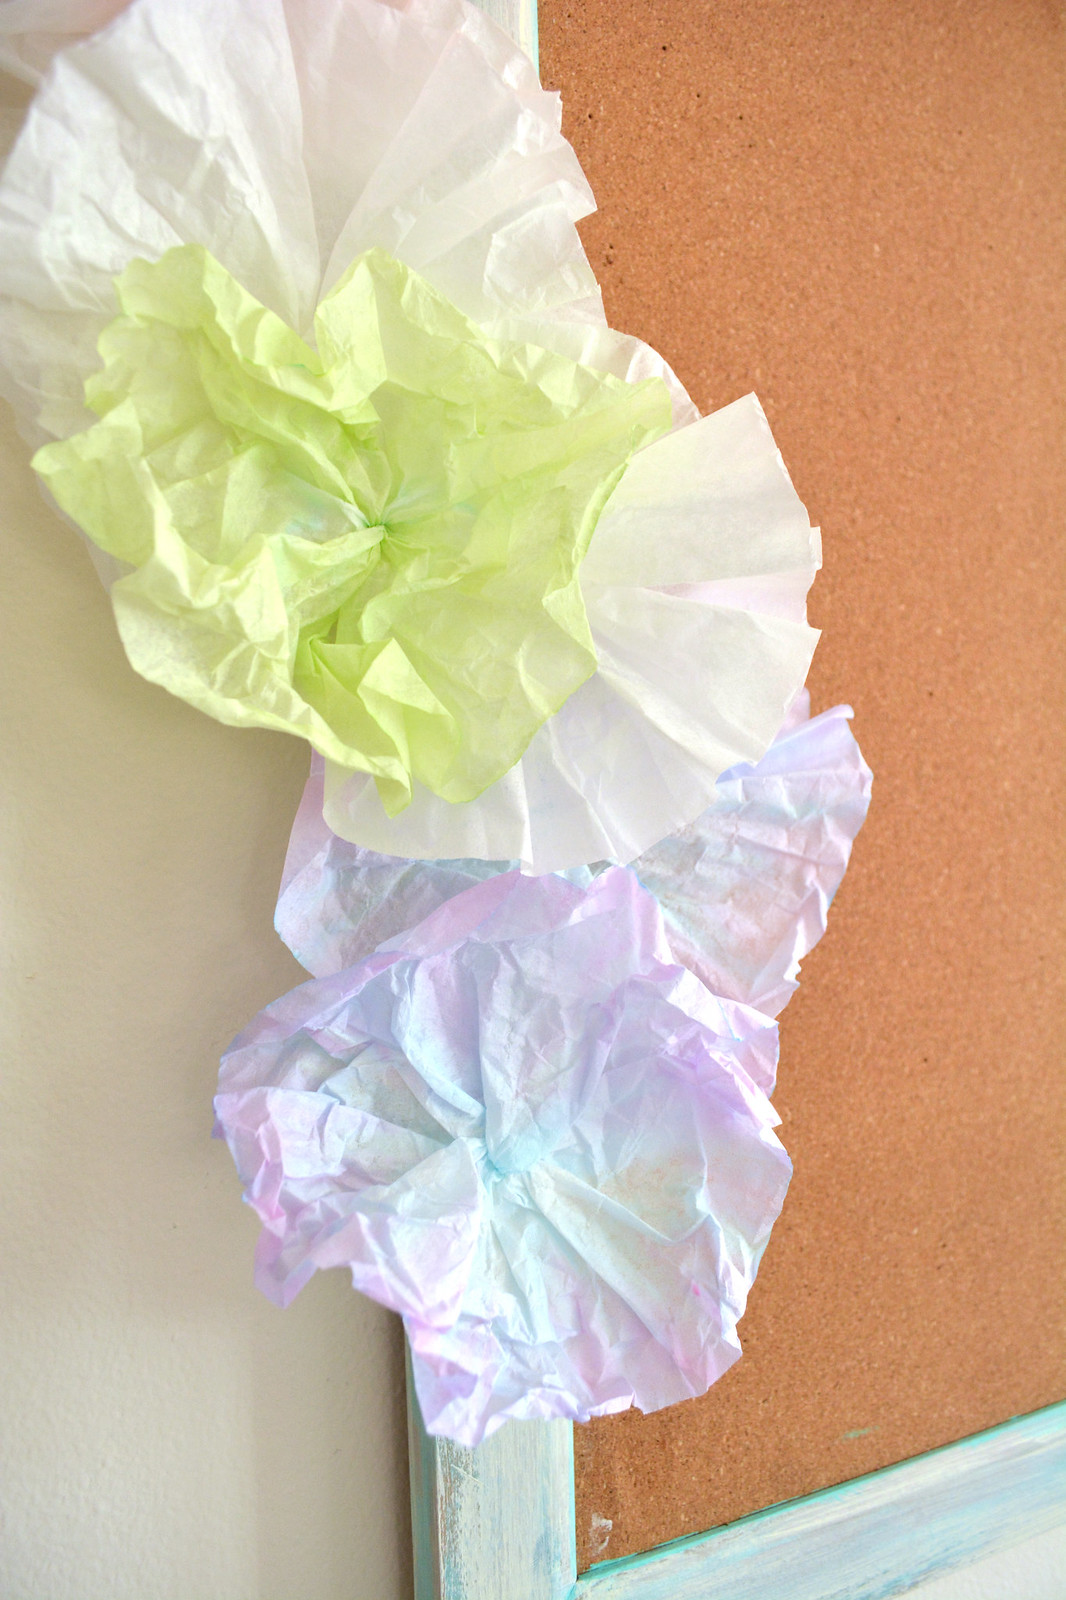
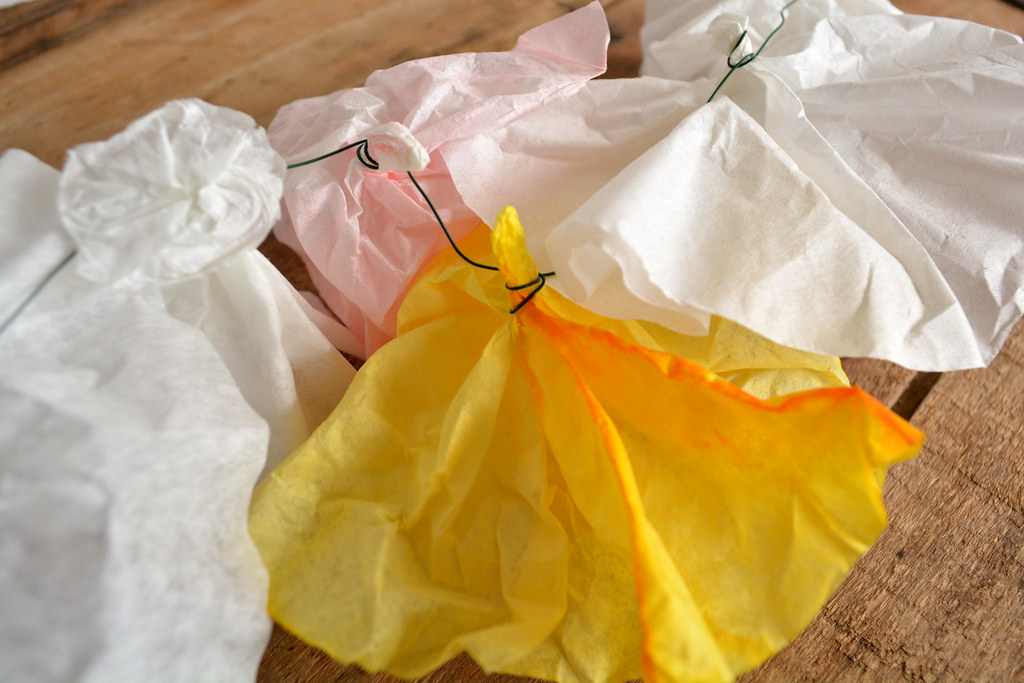
GarlandCloseUp2new

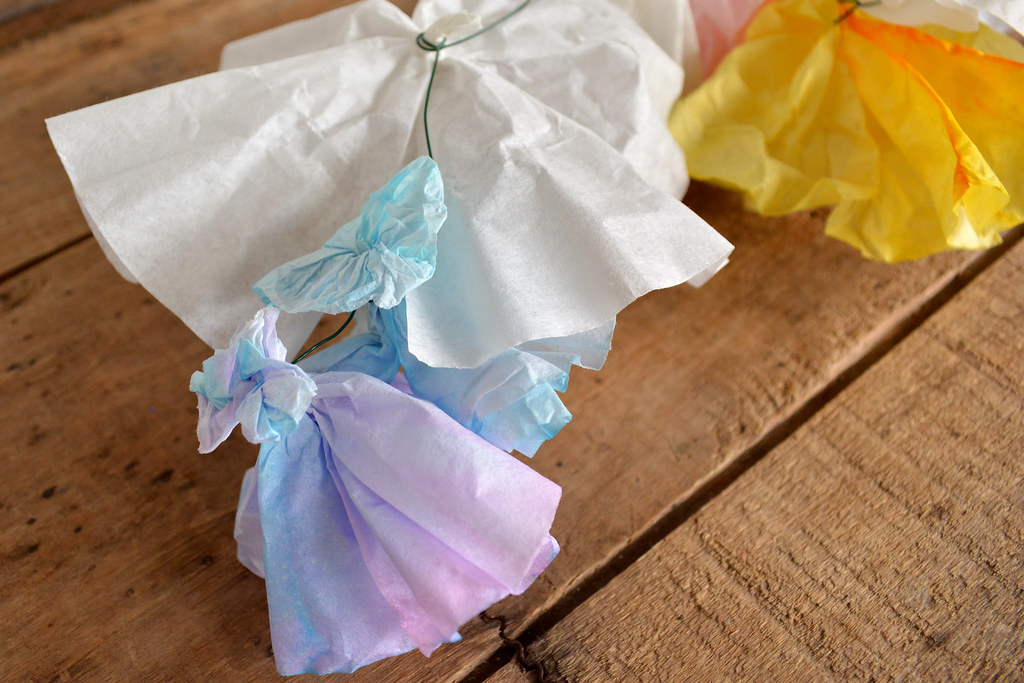
GarlandCloseUp

First I'll talk about dyeing the filters, then I'll show you how to make the different styles of flowers I used, and finally I'll tell you how to the garland together. Ready? Let's dive in! 


Supplies:
  • Coffee Filters - I used 40 total for a 5.5 garland
  • Red, yellow, blue, green, and purple food coloring
  • 24 gauge floral wire
  • scissors
Dyeing the Filters: I used food coloring in water to dye my filters. I made yellow, lime green, pink, purple and light blue. A little water + dye goes a long way! I used 1/2 cup or so of water for each color (which gave me 15 - 20 filters in each color - way more than I needed for this project!) Here's how much food coloring to add to your water:
  • Lime Green: A few drops of green food coloring and one drop of yellow.
  • Pink: Two or three drops of red food coloring.
  • Light Blue: Just a few drops of blue food coloring.
  • Purple: I actually used purple food coloring. It was a little jar of gel - I dipped my finger in a couple times and then stirred it into the water. You should be able to find purple at Joann's or Walmart. (Trying to mix red and blue to make purple doesn't really work! I'd definitely recommend buying some purple instead!)
  • Yellow: A couple squeezes of yellow - I felt like I was really using a lot, but you don't get a nice, sunny yellow unless you do!
Making the Flowers: I used five different flower shapes for this garland. You can find step by step photos and written instructions for each shape below. 

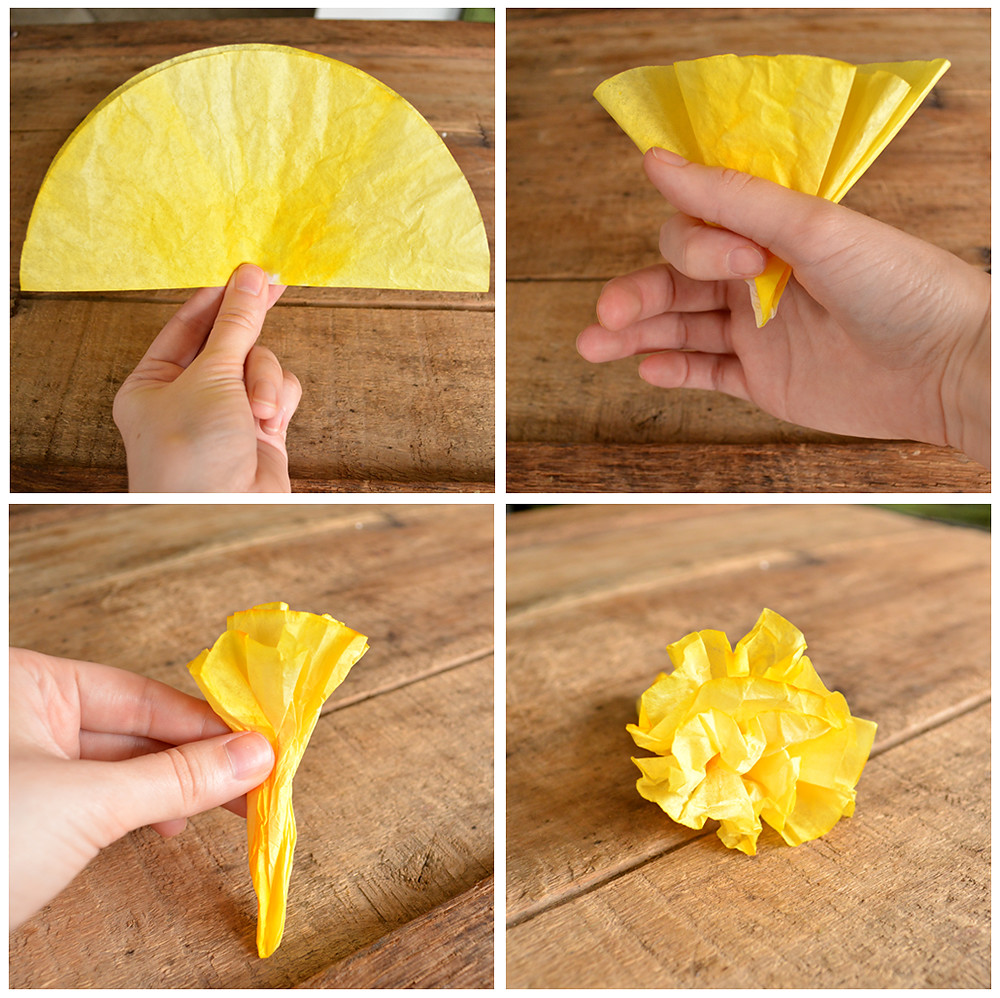
#1 - The Flat Pinwheel 

FlatPinwheelHowTo

  1. Fold your coffee filter in half, and grasp it in the middle between your thumb and fingers.
  2. Wrap the thumb and forefinger of your other hand around the base of the filter (you should be holding the coffee filter with both hands at this point, but I had to use one hand to take the photo!)
  3. Tighten your thumb and forefinger, and pull the coffee filter down through them.
  4. Still pinching the bottom tip of the coffee filter, pull the edges out and down into a circle.
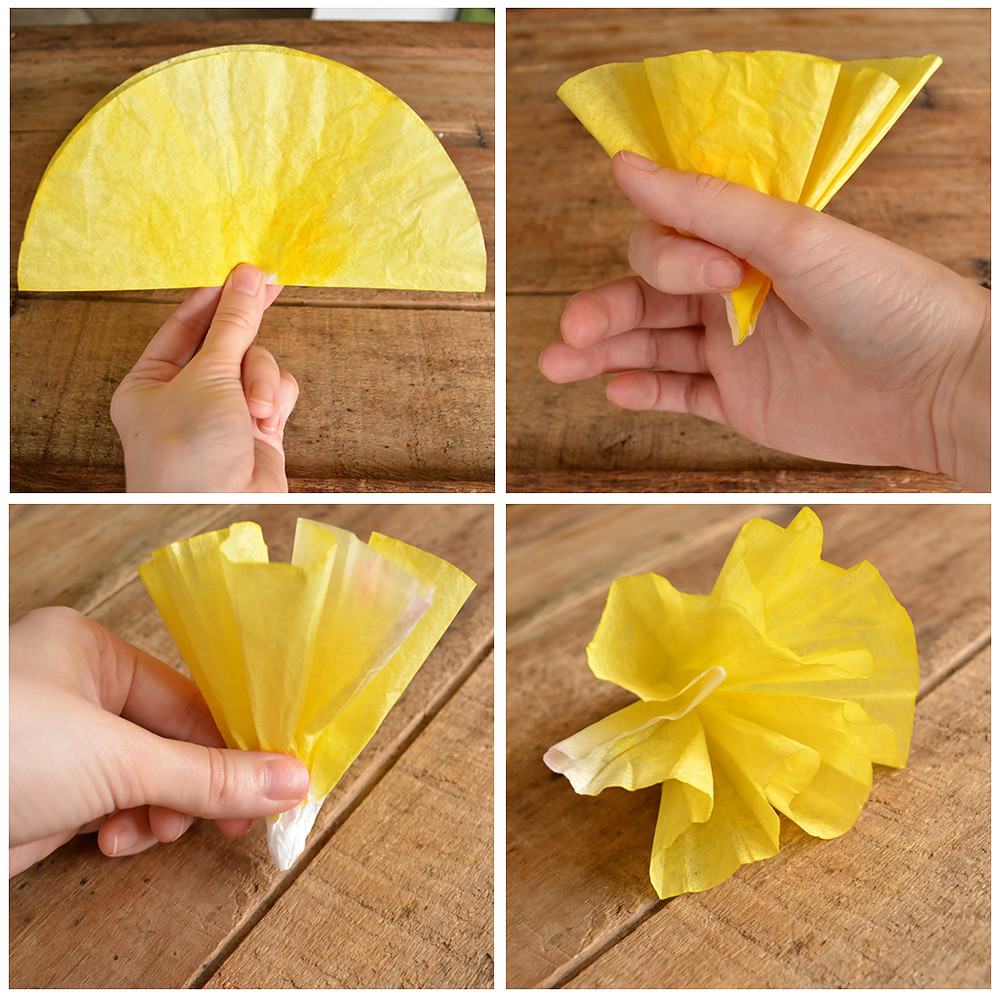
#2 - The Scrunched Pinwheel
ScrunchedPinwheelHowTo
  1. Same as pinwheel flower.
  2. Same as pinwheel flower
  3. Pinch about halfway up the base of the flower, and fold the edges down and out.
  4. Crumple and scrunch the edges of the pinwheel to give it more texture. You can scrunch the whole top up in your hand and then gently push the edges back down. Don't push or pull the edges too hard after scrunching - you don't want to loose all that pretty texture.
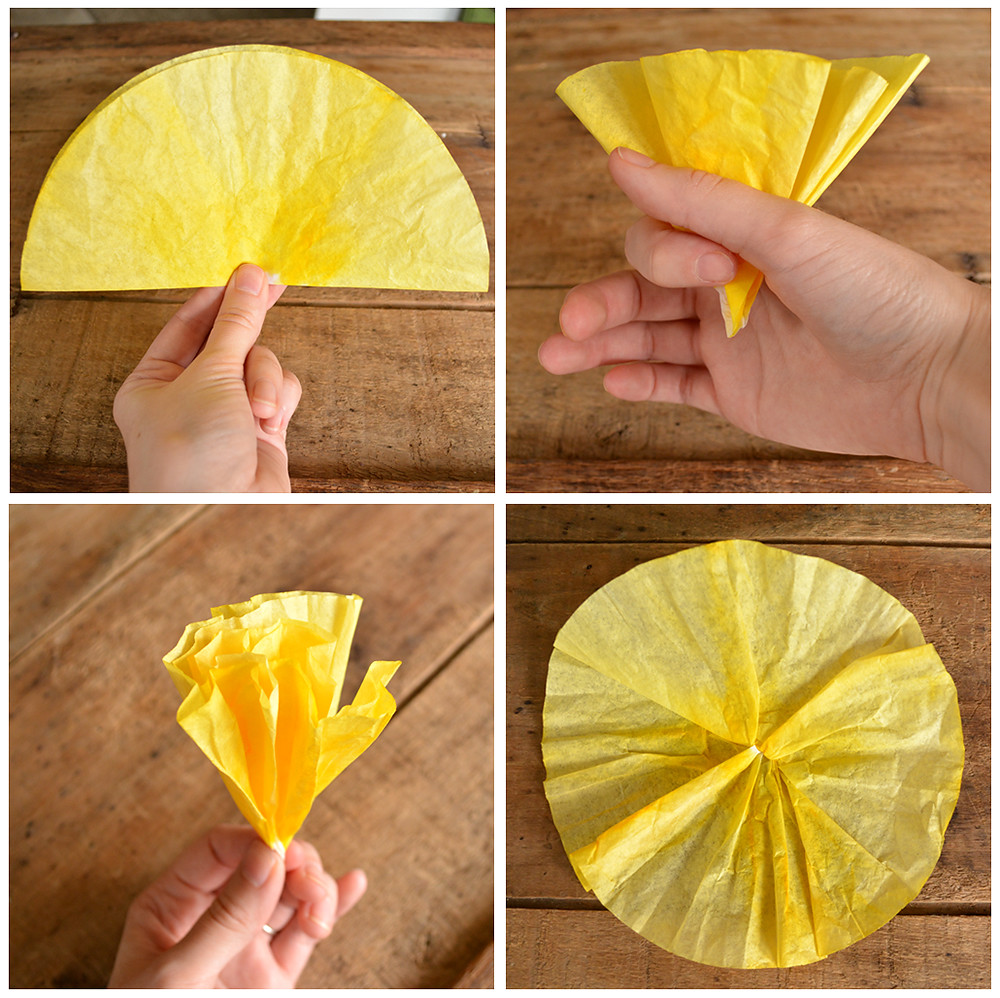
#3 The Carnation
CarnationHowTo
  1. Same as pinwheel flower
  2. Same as pinwheel flower
  3. Grab about 3/4 of the way up the base of the flower
  4. Scrunch the top, the fold and pull out just a little bit to create that ruffly carnation look
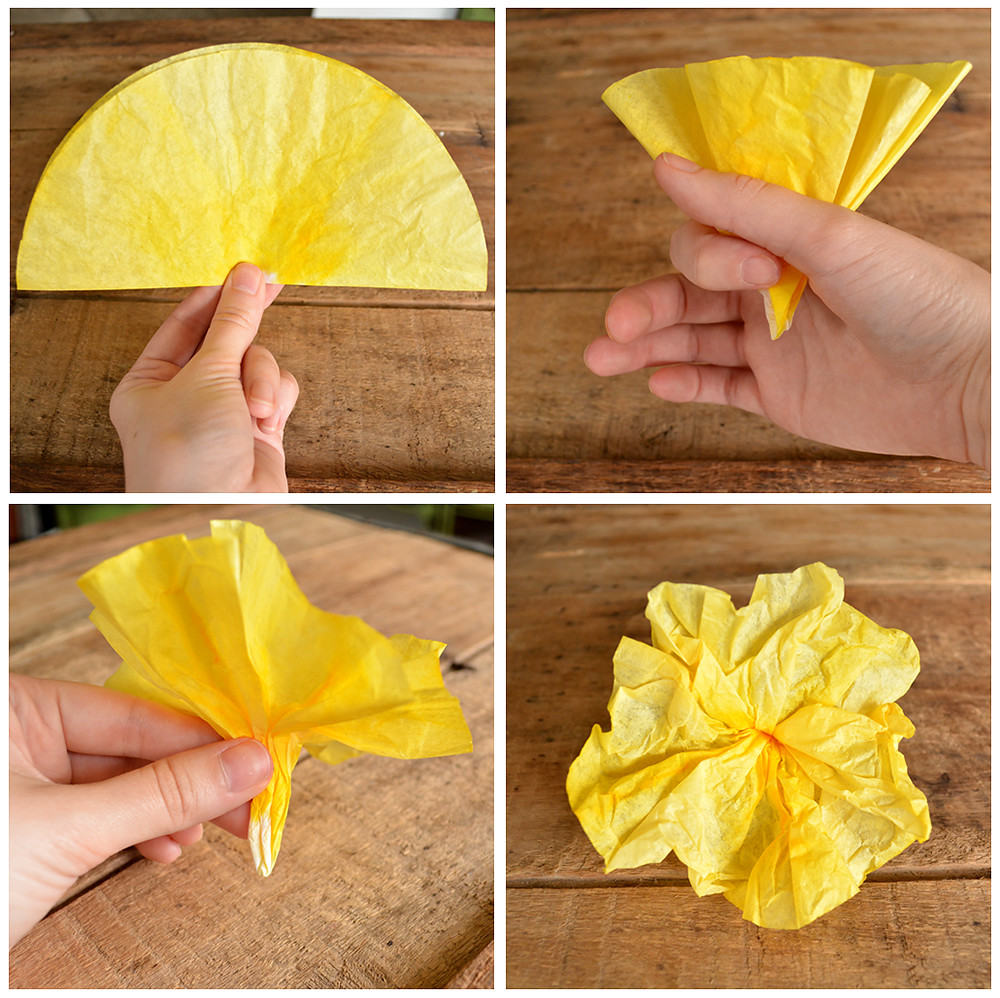
#4 The Loose Carnation
LooseCarnationHowTo
  1. Same as pinwheel flower.
  2. Same as pinwheel flower, but don't squeeze your thumb and forefinger into quite as tight of a circle.
  3. Pull the coffee filter through your fingers very gently. You want to be creating a shape similar to the one shown in step 3 of the pinwheel flower, but you want it to be much looser.
  4. Grip just a little ways up the base (as you can see in the third picture) and gently pull and run your fingers along the creases to smooth out the flower.
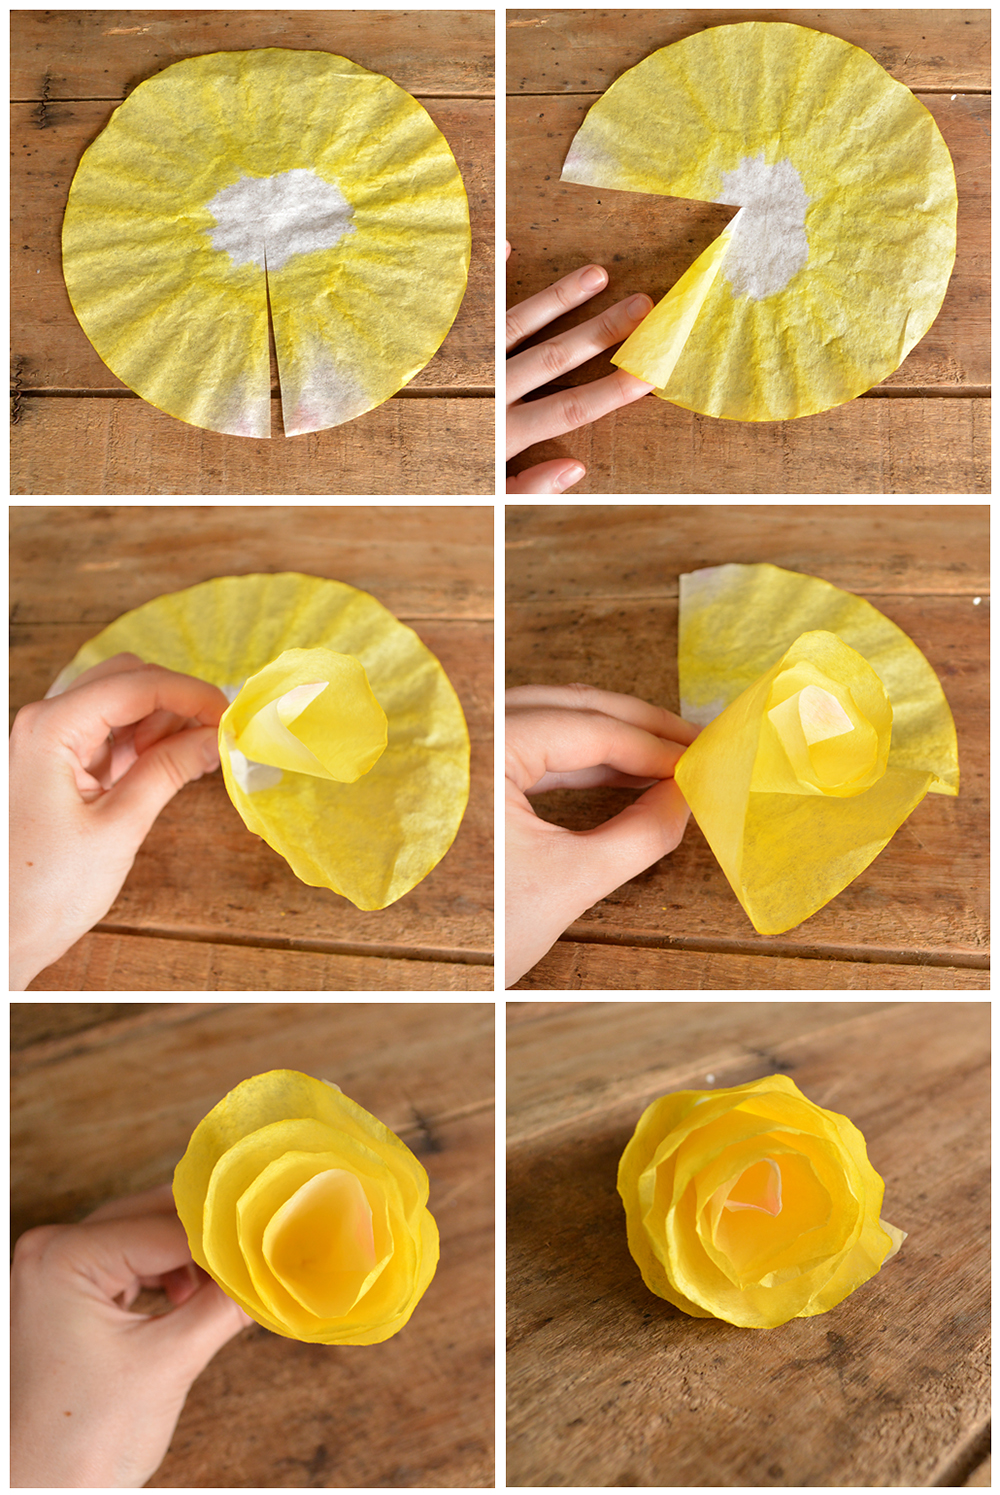
#5 The Rose
RoseHowTo
  1. Cut a straight line in your coffee filter, from the edge to about the middle
  2. Begin rolling one edge of the cut onto itself. You want to roll tighter at the bottom and looser at the top.
  3. Once your tube is started, pinch at the bottom and continue wrapping/rolling the coffee around itself.
  4. Keep rolling/wrapping your flower, always pinching it more tightly together at the bottom and letting the top edge roll loosely.
  5. Finish rolling and pinch your rose tightly at the bottom.
  6. Reach into the center and use your finger to curl the beginning a little bit tighter. Scrunch and pinch the top of the rose to give it some texture!
Making the Garland: Putting your garland together is really easy - just wrap wire around the base of each flower, continuing until your garland is the size you want it. You can bend and manipulate your wire into a more organic, wavy shape, or keep your flowers in a straighter line. A few tips and tricks are listed below. 
GarlandSegmentsnew

BackofSegments

BackofSegments2

BackofSegments3

  • It's easier to work with small sections of wire and flowers. I made 5 "mini garlands" and then connected them into one big piece
  • You only need to wrap the wire around each flower once or twice
  • For flowers like carnations, which have longer "stems" on the back side of the garland, you can snip off the excess filter and then flatten the leftover to help the flowers lay close to the wall
  • My garland was 5.5 feet long when finished. I used 39 coffee filters: 18 white, 6 purple, 4 each of green, pink, and yellow, and 3 blue.
  • I used the flat pinwheel shape the most, followed by the scrunch pinwheel. Then I threw in a few carnations, loose carnations and roses.
I hope you enjoyed the tutorial. Please let me know what you think, either here, or you can find me on Twitter, Facebook, Google+. You can also find me on Instagram and Pinterest :)


********************************

You guys - how insanely talented is Laura?! I love this garland. You could do any color and use it for any occasion. The "loose carnation" one is my favorite!! Definitely head to Laura's blog, Lovely Wren, to follow her for more great ideas.

Since this is a blog swap, I'm over at Lovely Wren today sharing a recipe for a super YUMMY lip scrub! Only 4 ingredients and here's a little sneak peek...


Don't forget to link up YOUR fab blog posts at Link'n Blogs! All links are seen on all 5 blogs that host the party. Link up > HERE <

Have a great weekend, everyone!

xo

Read More
  • Share This:  
  •  Facebook
  •  Twitter
  •  Google+
  •  Stumble
  •  Digg

Link'n Blogs #27

 tháng 5 28, 2014     features, link party, link'n blogs     No comments   


Welcome to Link'n Blogs {#27} !
A place to link up your projects and make new friends. We are all about visiting links and following new bloggers here at Link'n Blogs. Remember to leave comments and PIN PIN PIN!
Cause sharing is caring. 

**Your links will show up on ALL blogs hosting the link party!**

Interested in guest hosting Link'n Blogs?!
I've created a spreadsheet where you can sign up to host a link party! It's a great way to get to know other bloggers, share a recent post with other party goers and pick the features. Sign up using the link below!

I WANT TO GUEST HOST A LINK PARTY!

Grab my party button! 


*Feel free to post my party button on your blog and say you linked up here!*


I am sharing a tutorial for Silhouette Stencil Material. I'm kind of obsessed with cutting reusable stencils now!


My Review of Silhouette Stencil Material


CO-HOST:

Katelyn from Learning, Creating, Living
PINTEREST | FACEBOOK | BLOGLOVIN | INSTAGRAM


Katelyn is sharing an awesome concrete DIY. These planters are so stylish! I love how Katelyn styled them on her windowsill {photo on her blog post!}.

DIY Concrete Planters


CO-HOST:

Sonnet from Soho Sonnet
FACEBOOK | GOOGLE+ | PINTEREST | TWITTER

Sonnet is sharing a hilarious office supply makeover using her Silhouette Cameo. I died laughing - what a fun way to lighten up the work day! {get the FREE cut files on her blog!}

Funny Office Supplies


GUEST HOSTS:


Jenn from Ever After in the Woods
FACEBOOK | PINTEREST | GOOGLE+ | TWITTER

Jenn is sharing some great tips for arranging planters in your yard.

How to Plant a Beautiful Planter for your Porch, Patio, Garden


Kristi from Making It in the Mountains
FACEBOOK | INSTAGRAM | PINTEREST | TWITTER | GOOGLE+

Kristi is back to share a super cool clock she made using rustic plank wood. I love it!

Rustic DIY Wood Plank Clock


Here are this week's features:

My Pick

Dining Room Reveal by Fisherman's Wife Furniture


Katelyn's Pick

Pom Pom Throw Blanket by Delineate Your Dwelling


Sonnet's Pick

Anthropologie Inspired Pom Pom Pushpins by Average but Inspired


Jenn's Pick

Caramel Cappuccino Parfaits by A Girl in Paradise


Kristi's Pick

Tree Stump Chalkboard by Delineate Your Dwelling


Fan Favorites

DIY Dried Bush Makeover by Hooked on Homes


Lovin' the Layers Skirt Tutorial by So Much to Make


Bedroom Makeover Reveal by Stripes and Polka Dots


I know the bloggers featured would love if you would visit their posts and say hello!

All features will be pinned to my Link'n Blogs board. Follow it here!


Follow Daniela Walsh {Put A Bird On It}'s board Link'n Blogs {link party faves} on Pinterest.


Follow my blog! If you want to receive an email reminding you about the link party, leave your email when adding your link.
Link to your blog post -- not just your blog.
Share the love! Visit the other links and say who sent you.
If you enjoy a link, you can LIKE it {new feature!}
Adding your link gives me permission to feature you on my blog. 
Grab my party button! - See more at: http://iputabirdonit.blogspot.com/2013/12/diy-christmas-scriptures-advent.html#sthash.mPINNYsH.dpuf
Ok, here are the guidelines for the link party:  


Follow your HOSTS and GUEST HOSTS

If you want to receive an email reminding you about the link party, leave your email when adding your link

Link to your blog post -- not just your blog.

Share the love! Visit the other links and say who sent you

Adding your link gives me permission to feature you on my blog
Share this link party on social media to help Link'n Blogs grow!

*Don't be a LINK & RUN partier. Visit a couple links before you and a couple after!*


Happy Linking!

Leave a permalink on your blog back to the party to help our party grow!

*here is the link*
http://iputabirdonit.blogspot.com/2014/05/linkn-blogs-27.html


xo

blog | facebook | instagram | twitter | pinterest | bloglovin


**********************************************


I monitor each link and may delete a link if it is not something I want to promote on my blog. If you see your link was deleted, please email me. I'd be happy to chat about why! Thanks! 


**********************************************


Read More
  • Share This:  
  •  Facebook
  •  Twitter
  •  Google+
  •  Stumble
  •  Digg

My Review of Silhouette Stencil Material *spoiler alert: it's amazing!*

 tháng 5 28, 2014     crafts, fabric paint, Silhouette Cameo, Silhouette Tutorial     No comments   

Hi everyone! Sorry I've been a little MIA lately...we are still living at my dad's and YEP my craft box is STILL packed up.  :(  BUT - I'll try really hard to make it up to you with lots of fun crafts when I get my own house with my own craft room (hopefully!). We put in an offer on a home today, but the house is already under contract, so we are just a backup offer. We probably won't get it, so we are continuing to look...hoping we find that one special home soon!

Today, I've got a Silhouette tutorial for you. I originally guest posted this on Get Silvered and am excited to share it with you guys now! For those of you who don't know, I own the Silhouette Cameo and L-O-V-E it. I use it for almost every craft I make.  One in particular is the Maternity Countdown Shirt that I sell {SHOP}. I make each shirt by hand and would cut out a stencil for the numbers each and every time. It was kind of time consuming and used up a lot of vinyl per shirt. Just a couple months ago, I found out that Silhouette sells a -- you ready for this? -- REUSABLE STENCIL MATERIAL!!!!!! I pretty much freaked out and immediately bought some to try out. Well, it's AMAZING! It's basically a thin plastic that I use over and over and over again. I make so many shirts with one stencil - it saves me SO much time and money. This post is all about my review and a tutorial for cutting and using it!


The Stencil Material comes in a tube. This is great for storing, but not totally great for the stencil material itself. Mine had a few bubbles (you can see in pic below) which made me think at first that the cutting part did not cut all the way through. I was happy to see when I unloaded it that it did cut perfectly - I just had to pull the stencil off the paper backing carefully to make sure it came off along the cut lines in a couple of places. {addition: since I wrote this review, I've purchased more stencil material, and it didn't bubble. Maybe it was just my first try...!}


Load your stencil material into your Silhouette (no cutting mat - remember to adjust your rollers!) with the stencil material facing UP (paper backing on the bottom). Design your stencil in Silhouette Studio and click "Send to Silhouette." In the Cut Settings, just scroll down and pick your material - which is Stencil. It will then show you what to adjust your Blade & Rollers to. Easy peasy - now CUT!


This is what my stencil looked like after I cut it and removed it from the paper backing. YOU NEED TO KEEP THE PAPER BACKING! You'll put the stencil back on the paper backing after you use it, so you can keep it and use it again! See all of the number "inside" parts? Like the inside of the "8" and the "0" and the "9" - etc. ? I put those in a little plastic bag, to keep, so I don't lose them, since you need them for your stencil. You guys - I seriously can't tell you how much I love having a reusable stencil!!!!!!! It saves me SO much time. It's just awesome. :)


Another awesome part?! No transfer tape! Nope! The stencil is so sturdy that you can just place it directly onto whatever your stenciling by hand. *sigh* Total dream.


Paint your project (remember to put something UNDER your project, so the paint doesn't seep through!), let dry (use a blow dryer to speed up drying time!), and you're done! Remove the stencil - and SAVE IT for your next project. I just LOVE this new stuff. It's seriously awesome, if you can't tell.  :)

You have to let me know if you try this out and what your experience is. Here are some more projects I've used a stencil cut with my Silhouette Cameo:


DIY Glitter & Gold Heart Sleeves


DIY Anchor Tee {contributor post at Pretty Providence}


DIY Baby Wonka Bar Costume

See you all back here at 10pm for Link'n Blogs! Can't wait to see what YOU share!

xo
**BUY A MATERNITY COUNTDOWN SHIRT HERE!**
http://putabirdonitshop.storenvy.com


Read More
  • Share This:  
  •  Facebook
  •  Twitter
  •  Google+
  •  Stumble
  •  Digg

How to get instantly long hair

 tháng 5 27, 2014     Alice’s Articles, Alice's Outfits, Beauty, fashion, fashion blog, hair, hair extensions, lifestyle blog, Makeup and Beauty, OTD, outfit of the day, review     No comments   

This article is a lesson in “never say never”. Let’s start with the obvious – I have super long hair in these photos and we all know my normal hair is pretty short. 

Well guys, it’s not magic – it’s just hair extensions! And really great hair extensions if I can say so myself. And to think I have always dismissed them before – I knew hair extensions existed but was never really all that interested. Just like Jon Snow – I didn’t know anything.:)))

 
Instead, I was blaming my damn genes for not being able to provide Blake Lively or Selena Gomez type hair. I now realize I was delusional – there’s no way in hell that’s their natural hair. Now that my eyes have been opened, I could bet my life all those celebrities with heavenly hair wear extensions all the time. And my genes are perfectly fine, thank you very much! 

And since I got the rant out of the way, let me tell you a few things about all this hair on my head.:))) The extensions are Irresistible Me in Silky Medium Brown (#4), they are 20 inches long and the weight is 200 grams. They arrived very fast for an overseas order (the processing stage is 3 to 5 business days and the shipping another 2-4 days). They ship worldwide and the shipping is free for orders over $150 (otherwise you’ll have to pay $10 that are well-worthed since they use FedEx and the extensions will be delivered to your door). 

They are clip-ins and perfect for someone like me who doesn’t wear extensions on daily basis and just wants to put them on occasions. They have these little, sturdy clips that can be added in your hair in a matter of minutes (they are equally as easy to take off). They come in 10 wefts of different sizes (1 piece of 4 clips (8"/20cm), 2 pieces of 3 clips (6"/15cm), 5 pieces of 2 clips (4"/10cm) and 2 pieces of 1 clip (1.5cm) and there’s so much hair you can actually leave a few pieces out and only use part of them. The big weft is epic and has so much hair it can be used by itself and it’s going to look great. 


This is me before adding the hair extensions and thinking about how good I was going to look! :)

The best part is the hair itself – super soft, shiny and silky - so much so I have this crazy compulsion of touching it constantly. Fortunately, the shedding is minimal so that’s a problem just reported to my mental health. Being 100% human Remy hair, the Irresistible Me hair extensions can be cut, colored and styled without any problem as long as you take the same precautions you would with your own hair. Right here, I curled them because I wanted them to blend in perfectly. The ultimate goal was to trick everybody and make them believe I have breathtaking hair all on my own. And I think I did! The day I wore them everybody was looking at me with envy and/or lust!:)))))) I’m telling you, these are better than a boob job…a lot cheaper too (or so I heard:)))

All the hair inspired me to wear this insane ruffled maxi skirt with a salsa vibe. I might have tried a few dance poses as well, but I decided to only share those via Facebook where people are expected to be crazy and ridiculous. I couldn’t help myself and I threw on my Borealy necklace as well – it’s so pretty, it seemed like the necessary topping on the cake (and by cake I mean myself :)).

Since I know an unsettling amount of things about extension from my sister, I feel it’s my patriotic duty to make an even more detailed review about my Irresistible Me hair extensions (I have a second blonde set that I wear as highlights or instant ombre depending on the mood) and show you how to put them in! Willing or not, you will be educated!:):):):)

 If you like the hair extensions and want a set for yourself, I have a a permanent 10% off coupon code for you for anything you like on Irresistible Me, just use IrresistibleAlice at checkout by adding it in the Promo Code box.

 
Nici nu stiu de unde sa incep, asa ca o sa zic o chestie super evidenta – am parul lung si ieri era de destul de scurt! Nu-i o minune – sunt doar extensii!!! Rar am fost atat de incantata de un lucru pe care il incerc pentru prima oara! Extensiile sunt o gaselinta de a carei existenta stiam, dar nu eram neaparat interesata. Le asociam cu aspectul artificial al tipelor care fac din solar, unghii lungi, silicon si botox un ritual zilnic. Dar zau ca m-am inselat! 

Acum imi dau seama ca majoritatea celebritatilor cu par superb pe care le invidiam din acest motiv (Blake Lively, Selena Gomez, Rhianna) au mereu extensii in par. Si cand ma gandesc de cate ori mi-am blamat genele ca nu se ridica la inaltimea asteptarilor mele legate de par si nu numai!!! Cu siguranta exista o multime de extensii care arata ieftin si nenatural, dar acestea din capul meu sunt 100% naturale si arata grozav. Sunt sigura ca cei care nu ma cunosc si nu stiu lungimea reala a parului meu, nu si-ar da seama ca am trisat.


The before and after pictures from behind (well, that sounds a bit dirty but you get the gist!)

Extensiile sunt de la Irresistible Me (gama Silky Touch), au 20 de inches (50.8 cm) si 200 de grame. Am ales culoarea Medium Brown si bine am facut pentru ca se potriveste aproape perfect cu nuanta mea naturala. Un alt detaliu important – sunt clip-ins - adica se ataseaza cu clipsuri micute in par si pot fi puse si scoase super rapid (chiar si eu le-am pus in aproximativ 5 minute). Mai mult dureaza ondulatul care mie mi se pare ca ajuta enorm cu partea de “camuflare” – asa chiar nu o sa stie nimeni ca podoaba capilara este doar partial a ta. Parul meu este subtire si capricios, dar foarte moale si stralucitor si extensiile acestea sunt chiar si mai matasoase si mai frumoase decat ma asteptam (egaleaza si chiar intrec aspectul sanatos al parului din dotare). Am tendinta sa le ating tot timpul si din fericire, nu cade parul din ele, altfel chiar ar fi o problema.

Fiind 100% naturale, pot fi tratate exact ca parul meu: le pot spala, tunde, vopsi, ondula, indrepta cu placa si asa mai departe. Fiecare set vine cu 10 bucati de diferite marimi: o bucata epica cu 4 clipuri de 8 inches (20 cm) si mai mult par decat am eu in tot capul, doua bucati cu 3 clipsuri de 6 inches (15cm), 5 bucati de 2 clipsuri de 4 inches (10 cm) si doua bucati de 1 clip de 1.5 inches (aproximativ 4 cm). Bucata mare este atat de grozava incat poate fi folosita si singura in zilele in care ma grabesc. Trimit colete in toata lumea (transportul este $10 sau gratis pentru comenzile peste $150) si spre deosebire de alte comenzi de peste ocean, acesta a ajuns super rapid si direct la usa cu Fedex (procesarea dureaza 3-5 zile si transportul alte 2-4 zile). Nu am platiti nici taxe vamale in caz ca va intrebati.


Daca va plac, am un cupon permanent de 10% pentru orice comanda pe Irresistible Me, este suficient sa folositi cuponul IrresistibleAlice la checkout in sectiunea promo code si veti primi reducerea!


Sincer, sunt obsedata de ele! Da, am ajuns si acolo – pot spune cu mana pe inima ca sunt obsedata de extensii! Daca va intereseaza o sa fac un review amanuntit si un tutorial in care sa va arat cum se pun! Datorita Sarei stiu nefiresc de multe despre acest subiect si ar fi pacat sa las nefolosita atata intelepciune – asa ca vrand, nevrand o sa va informez.

Parul lung m-a inspirat sa port pentru prima oara aceasta fusta maxi cu volane careia ii tot dadeam tarcoale de un an, dar fara mare succes. Ma tot gandeam cu ce sa o port ca sa evit sa arat ca o dansatoare de salsa putin nebuna. Cu toate precautiile am avut niste tentative de dans printre blocuri, dar am pus dovada doar pe Facebook unde este normal si asteptat sa fi putin ridicol:). Nu putea sa lipseasca colierul Borealy pe care il port atat de des incat ati putea crede ca-i singurul meu colier! :)

So what do you think? How do you like me best - with shorter or longer hair?

 I’m wearing:
hair extensions / extensii - Irresistible Me
  skirt / fusta - Asos
crop top/ top scurt - random brand (very similar here)
leather jacket / geaca piele - random brand
 necklace/ colier - Borealy
  rings /inele - here


 Facebook / Bloglovin / Instagram / Pinterest / Tumblr / Twitter

Read More
  • Share This:  
  •  Facebook
  •  Twitter
  •  Google+
  •  Stumble
  •  Digg
Bài đăng mới hơn Bài đăng cũ hơn Trang chủ

Popular Posts

  • (không có tiêu đề)
  • Link'n Blogs #29
    Welcome to Link'n Blogs {#29} ! A place to link up your projects and make new friends. We are all about visiting links and following ne...
  • My Favorite Free Christmas Fonts AND a link party!
    Welcome to the party! The link party. Do you know what a link party is? I didn't until about 3 months ago. It's a party where massiv...
  • Cheap Crafts & Activities for Babysitters
    Whether you're a nanny for the whole summer or just babysitting on a Saturday, entertaining the kids while the parents are gone is obvio...
  • Redecorate for Spring Giveaway ... Win 1 of 3 Gift Cards
    YAY! I just love giveaways! There is no shortage of awesome giveaways here, it seems like. :) Put A Bird On It - Learning Creating Living ...
  • Birthday Fun
    This post should have happened so long ago. I have so many stories and adventures to be posting as April and May have been completely crazy...
  • Valentines Day {Harper Style} ... Guest Post by Amanda from Happily Ever After
    Hey guys! I'm Amanda from Happily Ever After and I'm so excited to be guest posting today on Put a Bird on It. This is my first gue...
  • 20 Fun Ways To Use A Mason Jar
    Mason jars have become a trendy item to use for many reasons, in many different ways. Instead of the traditional way of using mason jars (fo...
  • Outfit: pink herringbone coat
    Leave it to me to wear a pair of sky high white ankle boots on a rainy day! I didn’t touch them for months but somehow decided that this wa...
  • Pastel pink hair – Sakura backdrop
    These are probably the most unusual photos I have ever taken. I always wanted to try a colorful wig on, so when I had the opportunity, I cho...

Tìm kiếm Blog này

Được tạo bởi Blogger.

Lưu trữ Blog

  • tháng 3 2019 (1)
  • tháng 12 2015 (2)
  • tháng 10 2015 (1)
  • tháng 8 2015 (1)
  • tháng 7 2015 (1)
  • tháng 6 2015 (2)
  • tháng 5 2015 (2)
  • tháng 4 2015 (5)
  • tháng 2 2015 (1)
  • tháng 1 2015 (2)
  • tháng 11 2014 (2)
  • tháng 10 2014 (3)
  • tháng 9 2014 (3)
  • tháng 8 2014 (1)
  • tháng 7 2014 (5)
  • tháng 6 2014 (9)
  • tháng 5 2014 (22)
  • tháng 4 2014 (29)
  • tháng 3 2014 (30)
  • tháng 2 2014 (25)
  • tháng 1 2014 (32)
  • tháng 12 2013 (26)
  • tháng 11 2013 (16)
  • tháng 10 2013 (16)
  • tháng 9 2013 (12)
  • tháng 8 2013 (10)
  • tháng 7 2013 (12)
  • tháng 6 2013 (11)
  • tháng 5 2013 (17)
  • tháng 4 2013 (10)
  • tháng 3 2013 (13)
  • tháng 2 2013 (12)
  • tháng 1 2013 (12)
  • tháng 11 2012 (2)
  • tháng 10 2012 (7)
  • tháng 9 2012 (4)
  • tháng 8 2012 (5)
  • tháng 7 2012 (5)
  • tháng 6 2012 (1)
  • tháng 5 2012 (2)
  • tháng 4 2012 (5)
  • tháng 3 2012 (3)
  • tháng 2 2012 (2)
  • tháng 1 2012 (5)
  • tháng 12 2011 (1)
  • tháng 11 2011 (1)
  • tháng 10 2011 (4)
  • tháng 8 2011 (2)
  • tháng 7 2011 (2)
  • tháng 6 2011 (2)
  • tháng 4 2011 (3)
  • tháng 2 2011 (2)
  • tháng 1 2011 (2)
  • tháng 12 2010 (2)
  • tháng 10 2010 (2)
  • tháng 9 2010 (1)
  • tháng 8 2010 (8)
  • tháng 7 2010 (5)
  • tháng 6 2010 (9)
  • tháng 4 2010 (2)
  • tháng 3 2010 (3)
  • tháng 2 2010 (1)
  • tháng 1 2010 (3)
  • tháng 12 2009 (1)
  • tháng 11 2009 (2)
  • tháng 10 2009 (2)
  • tháng 9 2009 (3)
  • tháng 8 2009 (2)
  • tháng 7 2009 (2)
  • tháng 6 2009 (2)
  • tháng 5 2009 (1)
  • tháng 4 2009 (1)
  • tháng 2 2009 (2)
  • tháng 1 2009 (1)
  • tháng 12 2008 (1)
  • tháng 9 2008 (1)
  • tháng 8 2008 (1)
  • tháng 7 2008 (3)

Nhãn

  • $200 a month
  • $50 a week
  • $5000
  • 10 10 80
  • 10-10-80
  • 100 guests
  • 150
  • 2013
  • 75
  • a good cause
  • About Me
  • accessories
  • activities
  • adults
  • advertise
  • advertising
  • advice
  • affordable
  • alert
  • Alice’s Articles
  • Alice's Outfits
  • All Pin Up
  • alone
  • alternative
  • alternatives
  • aluminum
  • America
  • americans
  • apple
  • art
  • artwork
  • Artwork/Photography/ Illustration Spotlight
  • ASPCA
  • at home
  • average
  • avocado
  • awesome
  • Baby
  • babysit
  • babysitting
  • bake
  • baking
  • banana
  • bar
  • bay window
  • beach
  • Beauty
  • beer bottles
  • Being hot is like having a superpower
  • below
  • bench
  • best
  • better
  • beware
  • bins
  • birthday
  • Black Friday
  • Blogging on Vicodin
  • blogging tips
  • book
  • books
  • bookshelf
  • bored
  • bottle caps
  • boyfriend
  • brand
  • breakfast
  • bride
  • broth
  • budget
  • budgeting
  • bulk
  • bumpy wagon
  • burlap
  • butter
  • buying
  • buying in bulk
  • by myself
  • BYU
  • Calvin
  • Calvin reviews
  • cameras
  • cans
  • Cara Delevingne
  • card
  • card making
  • cardboard
  • carving
  • cash
  • Celebrity Files
  • cereal
  • challenge
  • character
  • Charlie Hunnam
  • cheap
  • cheaper
  • cheat sheet
  • checklist
  • children
  • Cholecystectomy
  • chowder
  • Christina Hendricks
  • Christmas
  • christmas decorating ideas
  • Christmas Ideas
  • Christmas trees
  • cilantro
  • cinema
  • cleaning
  • clever
  • closet
  • clothing
  • coconut
  • containers
  • contributor post
  • convenient
  • cook
  • cooking
  • corn
  • cost
  • costco
  • costume
  • Countdown In Style
  • couples
  • coupon
  • coupons
  • courthouse
  • craft
  • crafts
  • cream
  • creative
  • creative consulting
  • credit
  • cruise
  • cucumber
  • culture
  • cup
  • Cupcakes
  • cups
  • cut cost
  • cute
  • Cyber Monday
  • dad
  • dairy free
  • daiso
  • date
  • dave ramsey
  • deals
  • debt
  • decor
  • Decor-Design Ideas
  • decorate
  • decorating
  • decoration
  • delicious
  • demon airport horse
  • denton
  • design
  • dessert
  • desserts
  • destination
  • details
  • diet
  • difference
  • different
  • dining
  • dinner
  • dino buddies
  • dirndl
  • discounts
  • Disney
  • dixie
  • DIY
  • DIY Ideas
  • do
  • dollar
  • dollar store
  • don't
  • dream outfit
  • dress
  • drinks
  • DYI
  • Easter
  • easy
  • eating
  • ecola seafood
  • editorial
  • eggs
  • Elantra Touring
  • electrocution
  • elephant
  • embossing
  • embroidery
  • emergency
  • emotional
  • engagement
  • england
  • entertainment
  • envelopes
  • environment
  • etching creme
  • Events
  • expensive
  • fabric
  • fabric dye
  • fabric paint
  • fall
  • family
  • Fantastic Friday Link Up
  • fantasy
  • fashion
  • fashion blog
  • fashion icon
  • Fashion News
  • Fashion Week
  • fast
  • fast food
  • father day
  • features
  • ferries
  • financial
  • fires of faith
  • fixes
  • Flippin' Burgers is Terrible
  • flour
  • fonts
  • Food
  • Foodie
  • foodies
  • foods
  • For Him
  • forget yourself and go to work
  • fraggle rock
  • frames
  • free
  • free stuff
  • Friday
  • friendly
  • friends
  • frugal
  • fruit
  • fun
  • funds
  • funny
  • gadget
  • gallery wall
  • Game of Thrones
  • games
  • Gavin de Becker
  • geek
  • geekdom
  • gene wilder
  • general
  • ghosty
  • gif
  • gift
  • gift ideas
  • gift wrapping
  • gifts
  • girlfriend
  • Giveaway
  • GIVEAWAYS
  • gluten free
  • gold
  • good eats
  • good for you
  • Goth
  • graphics
  • groceries
  • grocery
  • grocery store
  • groom
  • group
  • Groupon
  • guacamole
  • guest
  • guest post
  • guests
  • hacks
  • hair
  • hair extensions
  • Hairstyles
  • Halloween
  • Halloween Ideas
  • Harvey Specter
  • haystack rock
  • health
  • healthier
  • healthy
  • hearts
  • heat transfer
  • heaven
  • help
  • hidden fees
  • hilarious
  • hoarding
  • holiday
  • holiday fun
  • holidays
  • Hollywood
  • home
  • home decor
  • homemade
  • How to
  • How to wear
  • hunger games
  • husband
  • icon
  • ideas
  • illustration
  • in
  • income
  • independence day
  • indoors
  • inexpensive
  • infographics
  • ingredient
  • injuries
  • inside
  • Inspiration
  • Instagram Hop
  • interior
  • interiors
  • iPad
  • iron chef
  • item
  • items
  • jewelry
  • jobs
  • july 4th
  • junk
  • just plain cool
  • kabocha
  • KGBDeals
  • kids
  • KidsQuest
  • kitchen
  • Knock Offs
  • last minute
  • LDS
  • leisure
  • less
  • lettuce
  • life hacks
  • lifestyle blog
  • link party
  • link'n blogs
  • lists
  • loaf your neighbor
  • Loki
  • LOST
  • lost job
  • lunch
  • Mad Men
  • make it yourself
  • Makeup
  • Makeup and Beauty
  • management
  • marketing
  • marriage
  • mason jar
  • maternity
  • max
  • mayo
  • meal
  • men
  • men's fashion
  • microwave
  • milk
  • miracle
  • mom
  • money
  • month
  • monthly
  • Mood swings
  • more
  • more expensive
  • mormon helping hands
  • motherhood
  • mothers day
  • movie star
  • movies
  • mushroom
  • music
  • Music makes the world go round
  • music video
  • must have
  • my love Monday
  • myth
  • nanny
  • natural
  • natural remedies
  • negotiating
  • networking
  • Nikon
  • no
  • no sew
  • no-bake
  • no-no's
  • Noises
  • nook
  • not Heroes
  • NYE
  • omen
  • on the square
  • one bite at a time
  • one month
  • onion
  • oompa loompa
  • open jar
  • organic
  • organization
  • organizing
  • organizing budget
  • OTD
  • other uses
  • our best bites
  • out
  • outfit of the day
  • outfits
  • overspend
  • paint
  • Paper
  • Park City
  • parties
  • Party
  • party ideas
  • pay off
  • pearls
  • personal style
  • phantom
  • photofabric
  • Photography
  • Pictorial
  • pictures
  • Pie
  • Pin Up
  • pixar
  • places to shop
  • plan
  • plants
  • plastic
  • polka dots
  • pop culture
  • Pop Culture's new Gods
  • poppies
  • potato
  • pregnancy
  • prepare
  • present
  • price
  • prices
  • printables
  • prints
  • produce
  • production design
  • productivity
  • Profiles
  • puddles
  • pumpkin
  • pumpkins
  • purchase
  • purchases
  • Puzzleday
  • pyro malfunction
  • quality
  • quality art
  • rainy season
  • rapid rewards
  • ratings
  • real
  • receipt
  • reception
  • recipe
  • recipes
  • recycle
  • Redhead
  • Redmond Yard
  • Redrum
  • refrigerate
  • refrigerator
  • rehearsal
  • remedy
  • repurpose
  • resale shops
  • resolution
  • resort
  • restaurant
  • retirement
  • reuse
  • review
  • reviews
  • Roomba
  • rule
  • runway
  • russell
  • russian
  • Ryan Gosling
  • safe
  • salad
  • sales
  • salt
  • Sam's club
  • santa
  • Sara’s Articles
  • sauce
  • save money
  • save up
  • saving money
  • scam
  • scary
  • season
  • seasonal
  • seasoning
  • serve
  • service
  • serving
  • sewing
  • sewing circle
  • shopping
  • Silhouette Cameo
  • Silhouette Tutorial
  • simple
  • singles
  • slicing
  • small
  • snack
  • snacks
  • snickerdoodle
  • snobbery
  • sons of the profits
  • soup cans
  • sour cream
  • spare time
  • spice
  • sponsors
  • spooky
  • spouse
  • spring
  • St Patrick's Day
  • Stadium of Fire
  • stage manager
  • star wars
  • steal
  • sticker paper
  • stocking
  • storage
  • store
  • street style
  • stuff
  • stuffers
  • stupid
  • style icon
  • substitutes
  • substitutions
  • sugar
  • Suits
  • summer
  • Sunday School
  • super easy
  • sweetums
  • taiko
  • Tattoos
  • Test Kitchen
  • texas
  • Thanksgiving
  • the blog strut
  • The magic in movies
  • The Russian Pack
  • things to buy
  • things to do
  • Thor
  • thrift store
  • thrift store 101
  • tiara
  • tight
  • tight budget
  • tillamook
  • tim tam
  • timeline
  • tins
  • tips
  • tips and tricks
  • TiVo
  • To Adorn
  • toast
  • toddler
  • Tom Hiddleston
  • tomato
  • too old
  • tools
  • top
  • top 10
  • top 15
  • top 45
  • toys
  • trash
  • Travel Diary
  • treats
  • trends
  • trick or treat
  • trip
  • tucson
  • tulle
  • tut tut
  • tutorial
  • TV
  • TV Show
  • TV Shows Junkie
  • TV's Golden Age
  • types
  • Ulyana Sergeenko
  • under
  • underground tour
  • unique
  • unnecessary
  • up
  • upcycle
  • uplift
  • useful
  • Utah
  • uwajimaya
  • vacation
  • Valentines Day
  • vegetable
  • vegetables
  • videos
  • vintage fashion
  • vinyl
  • Vogue
  • voucher
  • vs
  • vs.
  • walmart
  • washi
  • waste money on
  • wasteful
  • watches
  • waterfront
  • waverly
  • ways
  • ways to use
  • wedding
  • Wednesday Roundup
  • what not to buy
  • what to buy
  • wheat
  • whiteboard
  • whole grain
  • wicket
  • wife
  • Willy Wonka
  • window seat
  • wine bottles
  • wine corks
  • winter
  • Wishlist
  • wishllist
  • witches
  • without
  • women
  • world's best cheese 2010
  • wreath
  • yogurt
  • zodiac
  • zoo

Báo cáo vi phạm

  • Trang chủ

Giới thiệu về tôi

Admin
Xem hồ sơ hoàn chỉnh của tôi

Copyright © Halloween Party | Powered by Blogger
Design by Hardeep Asrani | Blogger Theme by NewBloggerThemes.com | Distributed By Gooyaabi Templates